Uploading to Opasnet Base: Difference between revisions
m (→Result: Opasnet Base Import added) |
(→Result: example uploading data) |
||
| Line 113: | Line 113: | ||
If you don't have Analytica Enterprise, you can still provide data to [[Opasnet Base]]. Just create a [[study]] or [[variable]] page that contains your information about your data, upload a data file to [[Opasnet]] (or just copy it to the page if the data is small), make a link on the page to the file on the page you created, and contact [[User:Juha Villman|Juha Villman]] or [[User:Jouni|Jouni]] so that they can upload the data for you. | If you don't have Analytica Enterprise, you can still provide data to [[Opasnet Base]]. Just create a [[study]] or [[variable]] page that contains your information about your data, upload a data file to [[Opasnet]] (or just copy it to the page if the data is small), make a link on the page to the file on the page you created, and contact [[User:Juha Villman|Juha Villman]] or [[User:Jouni|Jouni]] so that they can upload the data for you. | ||
==Example loading== | |||
===Data === | |||
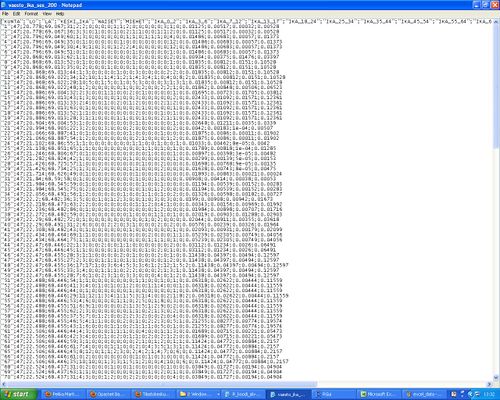
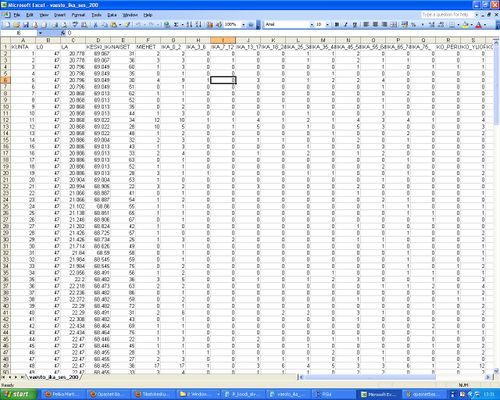
*At the first data was modified from text file to excel file. At the same time the first ID column was removed (see figures 1 and 2), | |||
[[File:Example text data.JPG|thumb|500px|center| Fig 1. Example raw data in text format.]] | |||
[[File:Excel data.JPG|thumb|500px|center|Fig 2. Text data is transformed to excel format. First id column has been removed.]] | |||
*Secondly we went to the opasnet page where the table should be uploaded and take "Upload data". (The page should be variable or method page!!) | |||
*In the Opasnet Base Import page all the inputs depends on the data. | |||
**Define Unit (If you have several units write "misc" | |||
**If data has onluy one column wioth results, but mark in to "First row contains the indices" | |||
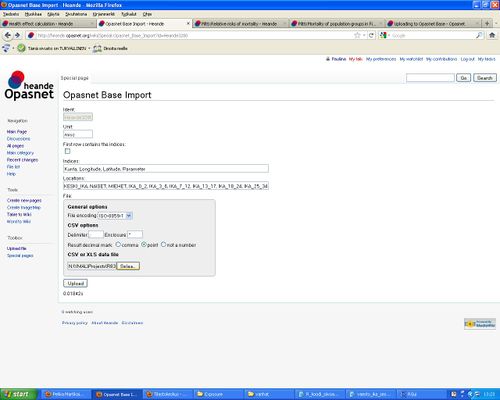
**If data has many columns with results, you have to define Indices and Locations (see Fig 3) Indices are all indices of data (last one is indice for Locations) in the table and Locations are name of result columns. All names must be separated with comma. | |||
[[File:Opasnetbase import example.JPG|thumb|500px|center|Fig 3. Inputs of example data]] | |||
jatkuu.. | |||
Revision as of 11:05, 7 September 2011
| Moderator:Jouni (see all) |
|
|
| Upload data
|
Uploading to Opasnet Base helps you understand what data could and should be updated to Opasnet Base and what the recommended data structures and formats are. For technical instructions how to use the current upload software, see Opasnet Base connection. For a general description about the database, see Opasnet Base and for technical details about the database, see Opasnet Base structure. For details about downloading data, see Opasnet Base UI.
Scope
What data could and should be updated to Opasnet Base and what are the recommended data structures and formats?
Definition
This section describes what the inputs are and the different ways they can be formatted for a successful upload.
What are the topics about which data can be uploaded into the Base? Well, basically any topic that provides useful information for any decision-making situation that has societal relevance. This sounds like a very wide definition, and it is. The data may be about which car models are environmentally friendly. It may be about pollutants in food. It may be new ideas about a societally just value-added tax.
What are, then, the data structures that are allowed? Although not all structures are allowed, almost any data can be easily transformed into the structure that is used in Opasnet Base. The data must be formatted as a two-dimensional table with one observation at each row. Cells of the table may contain either text or numerical values. Columns contain either explanations (or independent variables in statistics) or the actual observations (or dependent variables in statistics). This difference is important. Explanations are things that are fixed before the actual observation, while observations are those that are actually measured or observed. See the following table as example.
| City | Year | Sex | Body mass index BMI (kg/m2) | Blood cholesterol (mM) |
|---|---|---|---|---|
| London | 2010 | Male | 20 | 3.31 |
| London | 2010 | Male | 25 | 6.83 |
| London | 2010 | Female | 20 | 5.55 |
| London | 2010 | Female | 30 | 5.42 |
| London | 2010 | Female | 25 | 4.19 |
| New York | 2010 | Male | 22 | 3.33 |
| New York | 2010 | Male | 26 | 5.84 |
| New York | 2010 | Female | 28 | 5.67 |
| New York | 2010 | Female | 26 | 4.52 |
| New York | 2010 | Female | 24 | 5.67 |
The table seems unambiguous at the first glance, but it is impossible to interpret it correctly without knowing, which columns are explanations and which are observations. This may be a study performed in London and New York in 2010, where random people were asked for a blood test. In this case, city and year are explanations, and other columns are observations. However, the data may as well be summary statistics from a larger study, where the studied individuals were grouped in these cities based on their sex and body mass index (BMI), and the mean cholesterol in each group is the only observation column. (The data implies that London used BMI groups 5 kg/m2 wide, while New York used BMI groups kg/m2 wide, but you cannot know based on the data only.)
However, if you know which columns are explanations and which are observations, you can actually deduce many important aspects of the design of the study from which the data came. Of course many things must be explained elsewhere like how people were selected and what the base population studied was.
Another important feature of the data is, whether it is deterministic or probabilistic. With deterministic data, it is assumed that each row is an independent piece of information. With probabilistic data, it is assumed that there are random draws from a pool of potential observations (like an urn full of balls with different colours, each having the same probability of being picked). However, all observations are not picked from the same pool, but from several pools uniquely defined by the explanation columns.
Let's assume that we look at the table above and learn that it is a probabilistic data with two explanation columns. We then know that people were randomly picked from either London or New York in 2010 (explanation columns are always the first ones on the left side). In London, two happened to be males and three females, with measured BMIs and cholesterol levels. Thus, there are five observations from the pool defined by "London 2010", and also five observations from "New York 2010." These are numbered 1..5. If the data is deterministic, the observation number is 0 for all rows.
Result
There are several different tools to upload data to Opasnet Base. These are first listed and described here, and then more details are given either here or on a separate page.
- Table2Base is a functionality that uploads a table from an Opasnet page to Opasnet Base. <t2b> tag is used to make the table. By default, the table content replaces any previous content in Opasnet Base every time when the table is changed and the page saved. Currently, there can be any number of explanation columns but only one observation column in a t2b table. It will be made possible to have a freely chosen number of also observation columns.
- Opasnet Base Connection for R is a group of R functions that can easily upload data from models run in the R environment.
- Opasnet Base Import is a tool for uploading data in CSV or XLS files to the Opasnet Base. Registered Opasnet users can use this tool by following the "Upload data" link in the top right corner box on any variable (or other data storing) page.
- Table2Base functionality can also be extended to upload data from a questionnaire form on an Opasnet page. This way, the data itself does not stay on the page and can therefore only be seen from the base. Currently, this functionality uses Google forms to store data (see Widget:Google Form), and therefore the data is not stored in Opasnet Base but as a Google document instead. A version that would store data into the base are under construction.
- Opasnet base connection was the original, Analytica-based tool to upload data. It is very good for whole Analytica models but not practical for data that is not already in Analytica. Also, there are currently some bugs in the code and it might not work properly. This tool is described on this page.
- Analytica Web Publisher (AWP) was a web-based version of Opasnet base connection. However, it was outside Opasnet environment, heavily dependent on technical support by Lumina, and not open source. Therefore, it is no longer in use.
Inputs

Overview
This method is used to save original data or model results (a study or a variable, respectively) into the Opasnet Base.
If an object with the same Ident already exists in the Opasnet Base, the information will be added to that object. Before you start, make sure that you have created an object page in the Opasnet wiki for each object (study or variable) you want to upload.
You must give your Opasnet username to upload data. The username will be stored together with the upload information. You must also know the writer password for the Opasnet Base if you are not using the AWP web interface.
Object info contains the most important metadata about your data. All information should be between 'quotation marks' so that they are not mistakenly interpreted as Analytica node identifiers.
- Analytica identifier (only needed for type 2, i.e. when Analytica nodes are uploaded): the identifier(s) of the node(s).
- Ident is the page identifier in Opasnet. If your study or variable does not already have a page, you must create one before uploading the data. The identifier is found in the metadata box in the top right corner of the Opasnet page. Note that if an entry with the identical Ident already exists in the Opasnet Base, the metadata will NOT be updated but the existing metadata will be used instead.
- Name: a description that may be longer than an identifier. This is typically identical to the respective page in Opasnet.
- Unit: unit of measurement. This is the same for the whole object. However, if different observation columns have different units, this must be clearly explained in the respective Opasnet page.
- # Explanation cols (only needed for type 1 Data table): the number of columns that contain explanatory information (see below).
- Observation name: a common name for all observation columns. If omitted, 'Observation' is used. See below for more details.
- "Probabilistic?" affects only the upload format 2 Analytica model. If Probabilistic? is Yes or 1, then the Analytica node is treated probabilistically; otherwise Mid values are used. Data tables are always treated deterministically, i.e. each row is one cell. R↻
- Append to upload: Typically, a data upload happens in a situation where corrected or improved data is entered, and the already existing data (if any) is replaced by the new data. (The old data is not deleted, and it can be retrieved if needed.) In this case, the answer to the question "Replace data?" should be Yes. On the other hand, sometimes the data is entered as smaller parts, and the whole data consists of several uploads. Then you should answer No, and the data will be shown as one piece of data with the previous upload(s) for the user.
The data can be entered with two different ways.
- Data table: Give the number of rows and columns, and a table with the right size will be created. Then, you can copy-paste your data into this table. NOTE! The first row must contain column names.
- Analytica model: Give identifier(s) of Analytica model node(s), and the node results will be uploaded. You can upload a whole model at one time.
Advanced options:
Advanced methods for uploading data have been developed, but these are rarely used and therefore they are not kept up to date. If need be, they can be updated.
Platform: You must choose THL computer, because the AWP web interface is no longer in use.
Outputs
For learning how to access the data in Opasnet Base, read Opasnet Base and for technical details Opasnet Base UI.
Procedure
When you know what to put to the input fields, rest is very straightforward. You just check that you have entered the data correctly by pressing Check that your data looks sensible: Data table button. You may correct any errors at this point. Then, you just press Upload to Opasnet Base. It may take several minutes especially with large data.
Note! Currently you can only upload data if you have Analytica Enterprise in your machine and your computer is located in the THL network. You need the file Opasnet base connection.ANA. You can even upload a whole Analytica model at one time. You have to contact Juha Villman or Jouni to get the password for uploading data.
If you don't have Analytica Enterprise, you can still provide data to Opasnet Base. Just create a study or variable page that contains your information about your data, upload a data file to Opasnet (or just copy it to the page if the data is small), make a link on the page to the file on the page you created, and contact Juha Villman or Jouni so that they can upload the data for you.
Example loading
Data
- At the first data was modified from text file to excel file. At the same time the first ID column was removed (see figures 1 and 2),


- Secondly we went to the opasnet page where the table should be uploaded and take "Upload data". (The page should be variable or method page!!)
- In the Opasnet Base Import page all the inputs depends on the data.
- Define Unit (If you have several units write "misc"
- If data has onluy one column wioth results, but mark in to "First row contains the indices"
- If data has many columns with results, you have to define Indices and Locations (see Fig 3) Indices are all indices of data (last one is indice for Locations) in the table and Locations are name of result columns. All names must be separated with comma.

jatkuu..